Deploying SonarQube In My Self-Hosted Environment With SAML Authentication
Overview
If you are a software developer of any level, finding tools which help you improve your craft can be a major win. One such tool that I have been using for a long time is SonarQube. SonarQube is a server and associated build/IDE plugins to analyze your code for security issues, bad practices, and "smells". Not only does it identify these issues, but it also explains why they are issues and helps you to become a better developer in almost any languages it supports. Using SonarQube has helped me to be come a much better developer over the years with minimal friction and higher productivity.
Self-Host Or Use The Free Cloud Services?
The choice of using the free SonarCloud or self-hosting is up to you. I like to have my services private and under my own control, so this post will describe how I am deploying SonarQube on my container host. Both ways are helpful and productive.
Getting Started
As with most other things on my blog related to self-hosting, it starts with Podman and Quadlets. Refer to my earlier post about Podman & Traefik so that some of the context around how I set up TLS and reverse HTTP proxy make sense.
This is the Quadlet file I use for SonarQube:
[Unit]
Wants=traefik.service
Requires=backend-network.service
Requires=frontend-network.service
Requires=postgresql.service
After=network-online.target
Requires=network-online.target

[Container]
ContainerName=sonarqube
Image=docker.io/library/sonarqube:community
PodmanArgs=--memory=3G --cpus=3
SecurityLabelType=container_runtime_t
Environment=SONAR_JDBC_USERNAME=dbuser
Environment=SONAR_JDBC_URL=jdbc:postgresql://postgresql:5432/sonarqube
Environment=SONAR_JDBC_PASSWORD=**REDACTED**
Environment=SONAR_JDBC_MAXACTIVE=10
Environment=SONAR_JDBC_MAXIDLE=5
Environment=SONAR_JDBC_MINIDLE=2
HealthCmd="curl -ks -o /dev/null http://localhost:9000"
HealthInterval=3s
HealthRetries=5
HealthStartPeriod=15s
HealthTimeout=3s
Network=backend
Network=frontend
Label="traefik.enable=true"
Label="traefik.docker.network=frontend"
Label="traefik.http.routers.sonarqube.rule=Host(`sonarqube.example.com`)"
Label="traefik.http.routers.sonarqube.entrypoints=https"
Label="traefik.http.routers.sonarqube.service=sonarqube-http"
Label="traefik.http.routers.sonarqube.tls.certresolver=traefiktls"
Label="traefik.http.routers.sonarqube.middlewares=secure-headers@file"
Label="traefik.http.services.sonarqube-http.loadbalancer.server.port=9000"

[Service]
Restart=always

[Install]
WantedBy=default.target
Since I already have an instance of PostgreSQL running in my container environment, I just create a new database in that server and connect to it from SonarQube. I also expose SonarQube using Traefik the same as all of my other web-based services. There ARE some additional considerations for SonarQube which I will detail below:
SonarQube uses ElasticSearch, so on a Linux system you need to ensure that various kernel and ULIMIT parameters are set to allow it to run properly
bashsysctl -w vm.max_map_count=524288 sysctl -w fs.file-max=131072 ulimit -n 131072 ulimit -u 8192- These settings need to be configured such that they are applied on system startup
ElasticSearch requires that SECCOMP is enabled in the Linux kernel as described HERE
ElasticSearch also requires write access to
/tmpas described HERE
Adding A Custom Script Mapper To Keycloak
I already customize my Keycloak container instance to install my own them which matches the rest of my domain. I added some customization to my container build to also add a custom script mapper which is needed for SonarQube to display users properly.
Mapper Script
Here's my mapper script (in JavaScript) which combines the first and last name into a single field. I named this file full-name-mapper.js
var user = keycloakSession.getContext().getUser();
var fullName = user.getFirstName() + " " + user.getLastName()
exports = fullName
You also need a keycloak-scripts.json which looks like this:
{
    "saml-mappers": [
        {
            "name": "Full Name Mapper",
            "fileName": "full-name-mapper.js",
            "description": "Combine firstName and lastName in a single field"
        }
    ]
}
And both of these files need to be put into a JAR file with the following structure:
<root>
  - full-name-mapper.js
  - META-INF/
    - keycloak-scripts.json
This JAR is then included when you build your customized Keycloak container as shown below:
FROM quay.io/keycloak/keycloak:26.5 AS builder

# Enable health and metrics support
ENV KC_HEALTH_ENABLED=true
ENV KC_METRICS_ENABLED=true
ENV KC_DB=postgres

# Configure a database vendor
ENV KC_PROXY_HEADERS=xforwarded
ENV KC_HTTP_ENABLED=true
ENV KC_DB=postgres
ENV KC_FEATURES=preview

COPY mappers.jar /opt/keycloak/providers/mappers.jar    ## Mappers added here!

WORKDIR /opt/keycloak
RUN /opt/keycloak/bin/kc.sh build

FROM quay.io/keycloak/keycloak:26.5
COPY --from=builder /opt/keycloak/ /opt/keycloak/
COPY . /opt/keycloak/themes/example

# change these values to point to a running postgres instance
ENV KC_HTTP_ENABLED=true
ENV KC_DB=postgres
ENV KC_DB_URL=jdbc:postgresql://postgresql:5432/keycloak
ENTRYPOINT ["/opt/keycloak/bin/kc.sh"]
Create A Keycloak Group For sonar-administrators
- Log on to your Keycloak instance and ensure you can manage the Realm you want to use for SonarQube.
- Navigate to Groups and create a new group named
sonarqube-administrators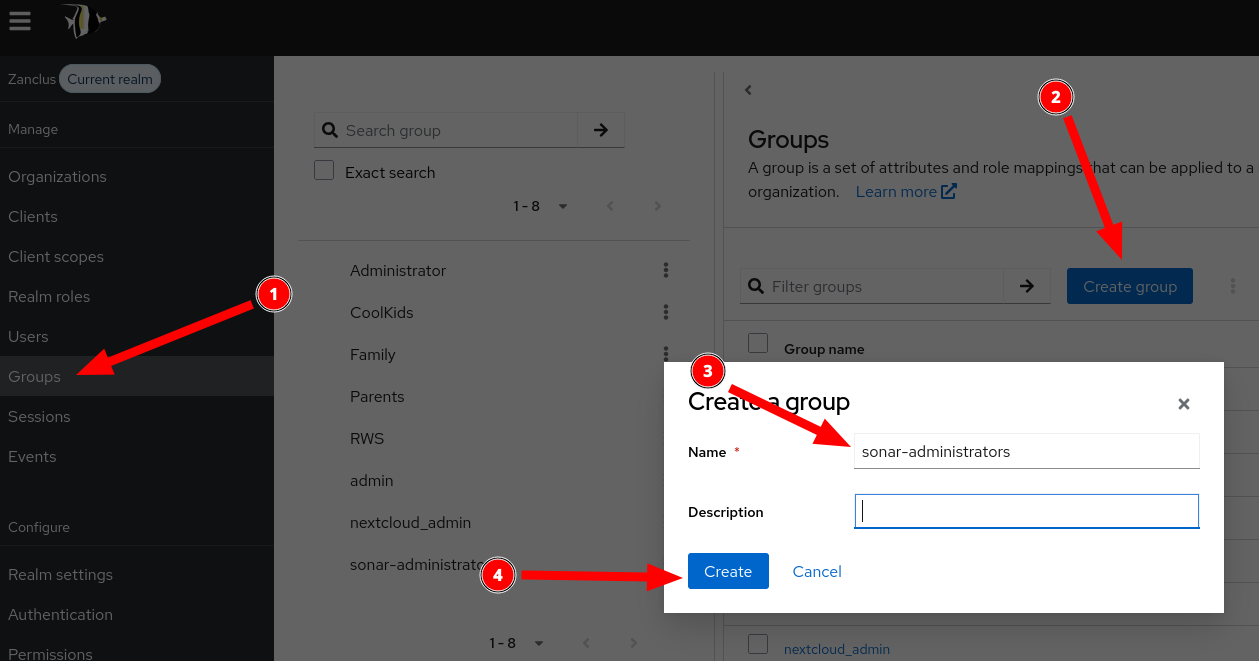
- Add one or more users to the
sonarqube-administratorsgroup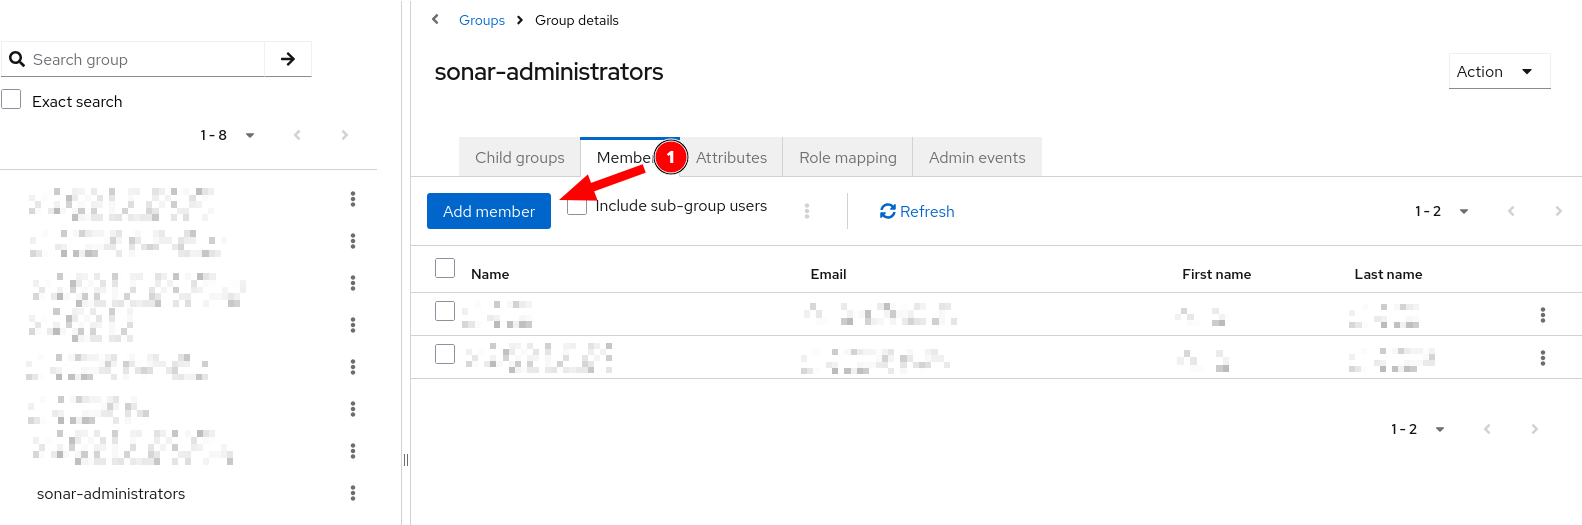
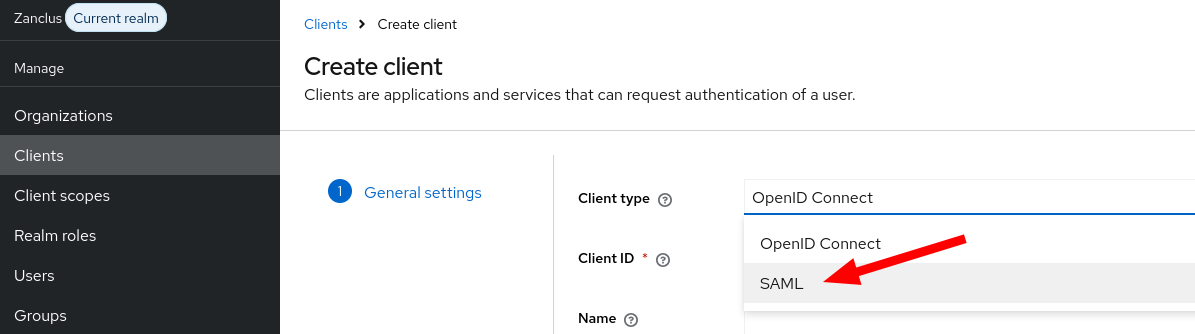
Adding A SAML Client To Keycloak
- Log on to your Keycloak instance and ensure you can manage the Realm you want to use for SonarQube.
- Go to Clients and create a new client for SAML
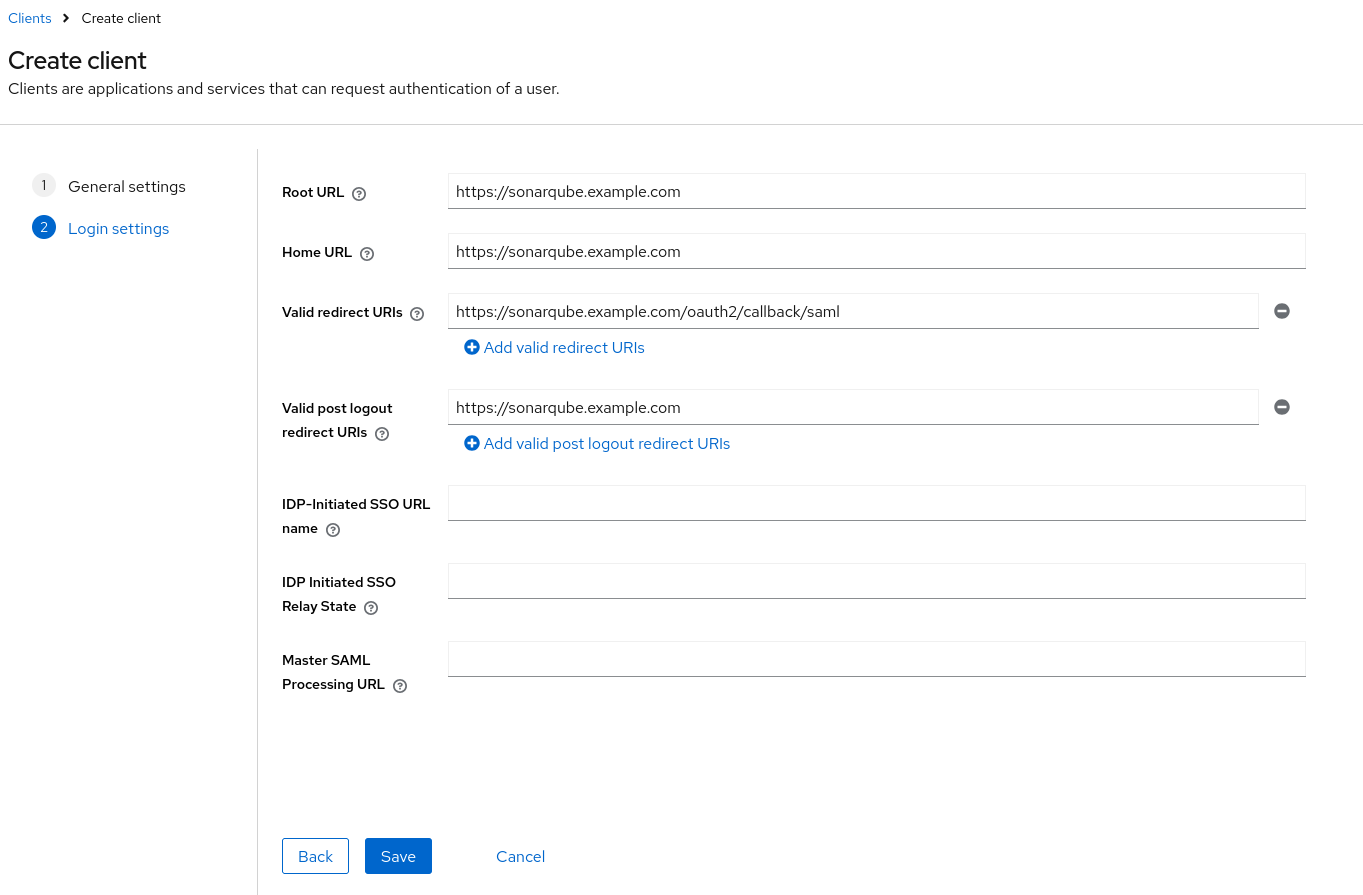
- Fill in the name and client ID for the SAML Client
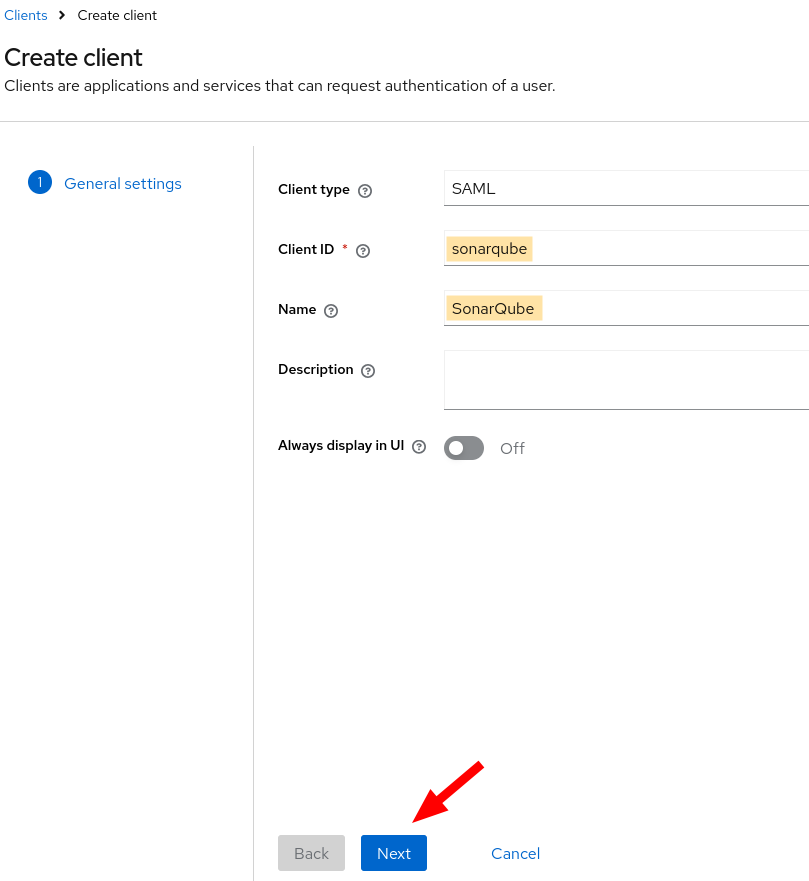
- Define the base, home, and valid redirect URLs for the client; then click Save
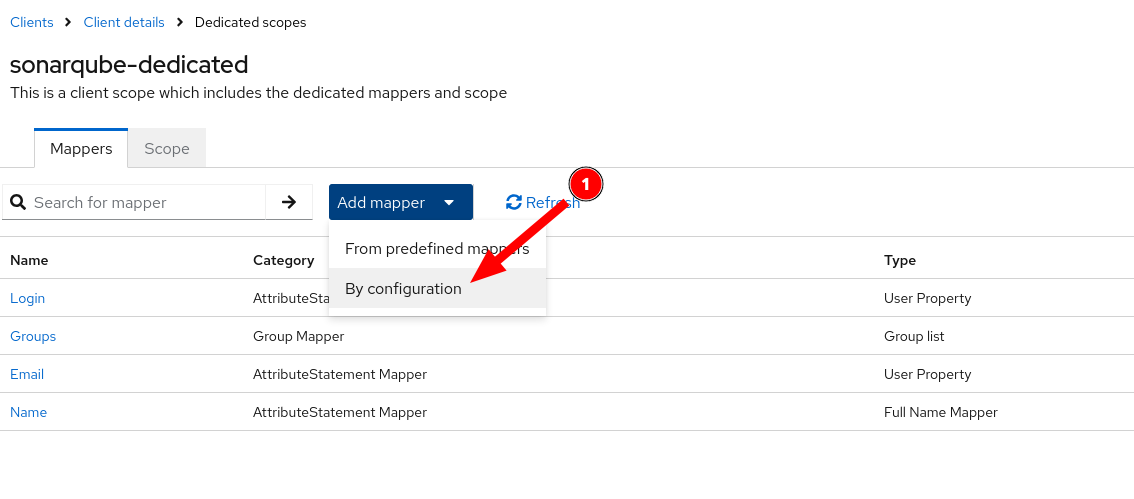
- Once the client is created, navigate to the Client Scopes tab and open the
sonarqube-dedicatedscope so that we can set up the mappers
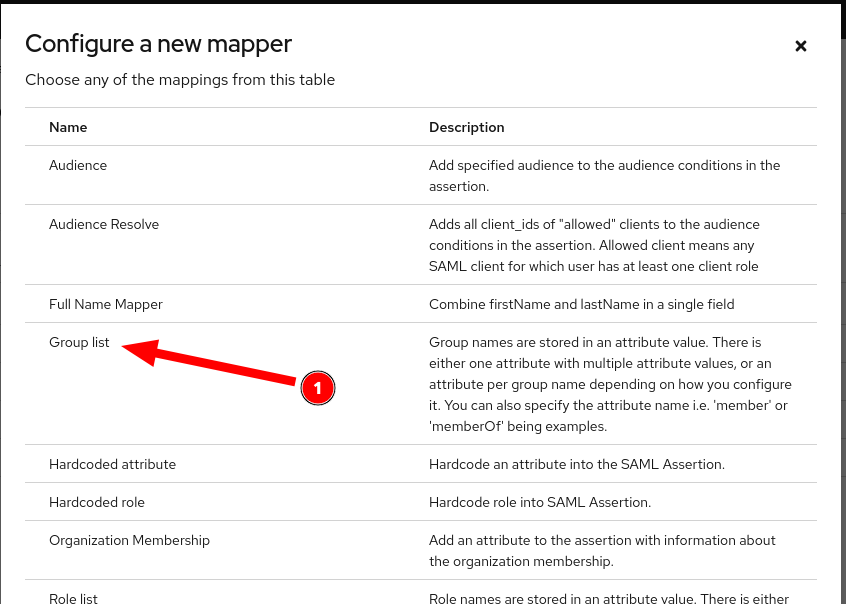
- Add mappers for the fields needed by SonarQube by clicking on Add Mapper and selecting By Configuration
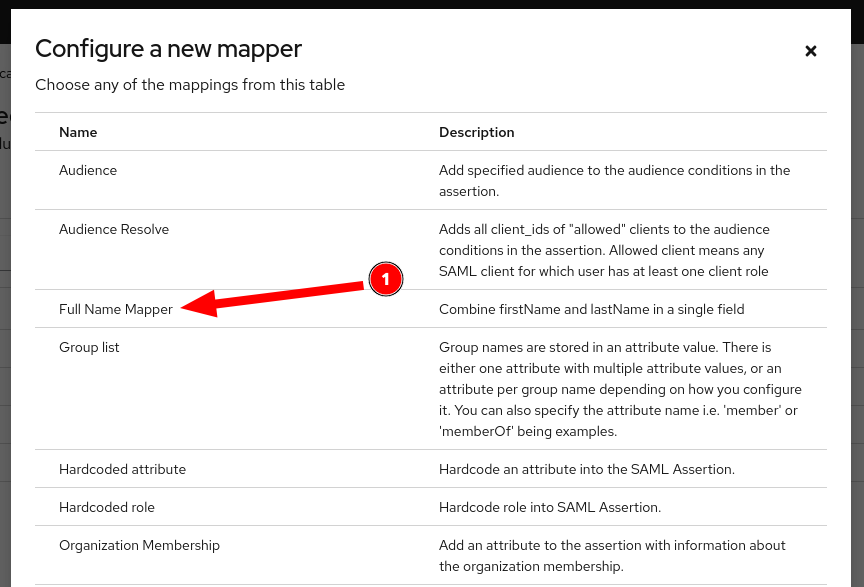
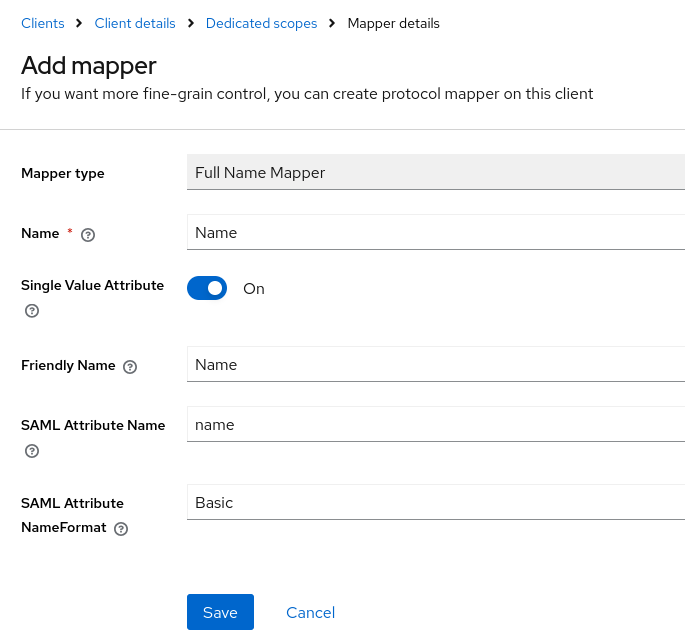
- The first mapper should use the custom script mapper we created above
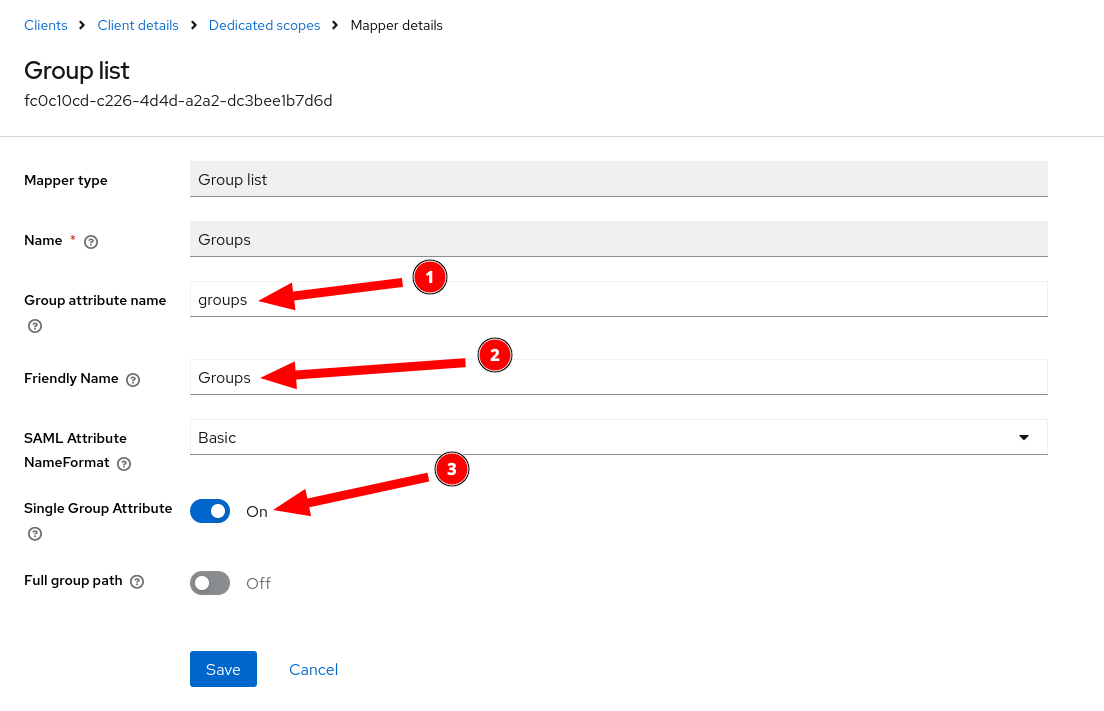
- Create a mapper for the Keycloak groups
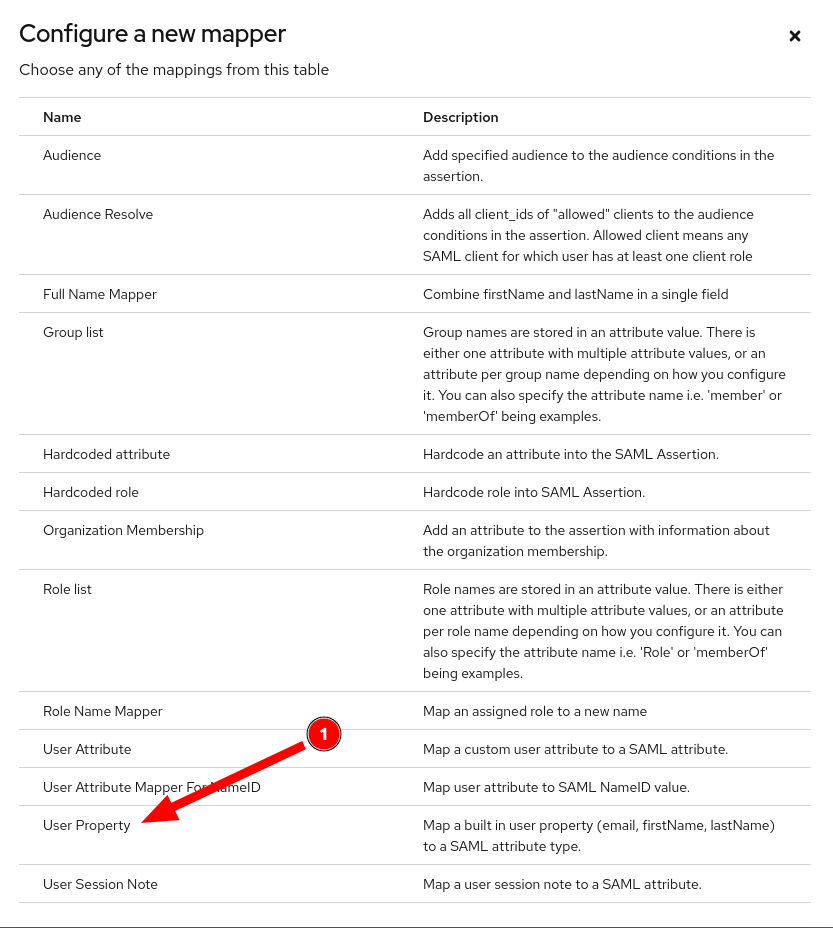
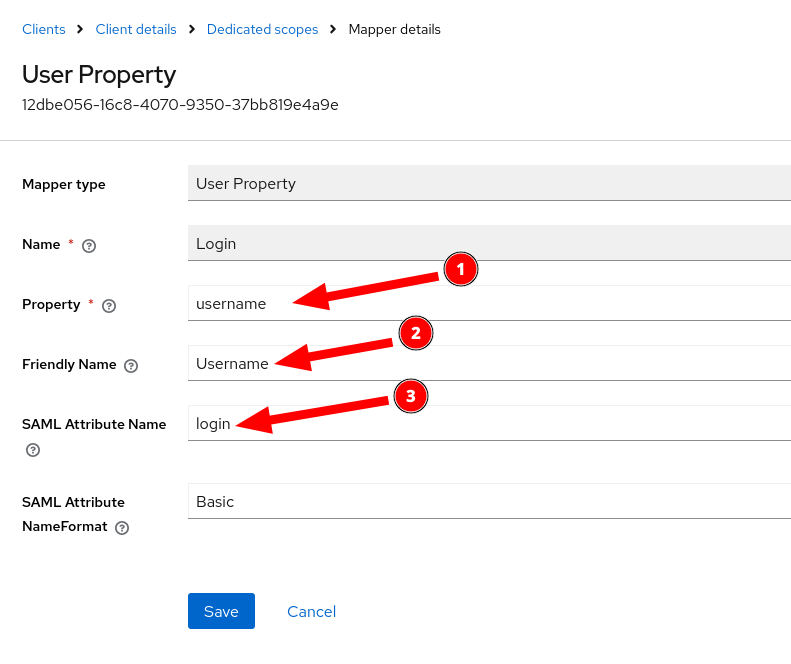
- Create the Login and E-Mail Mappers using the User Property mapper under By Configuration
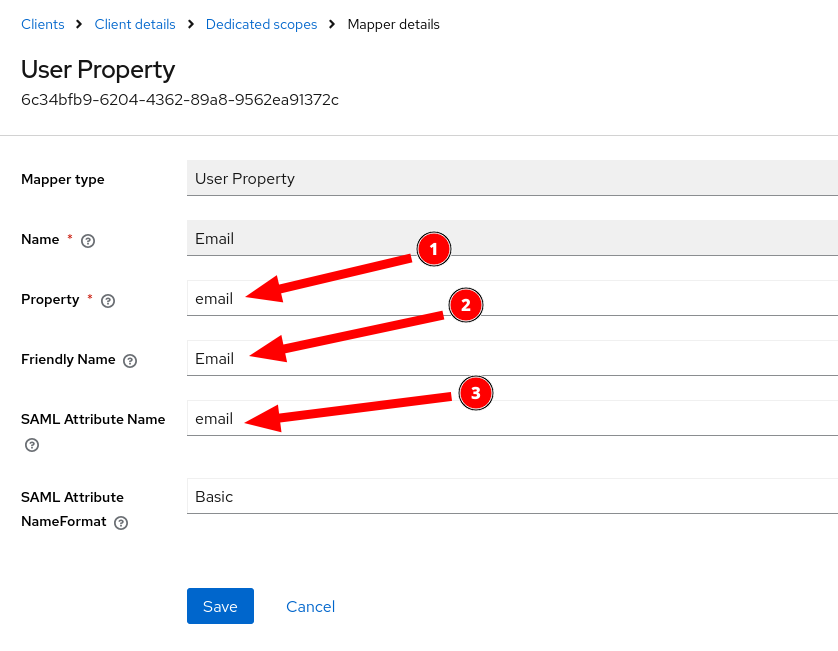
Configuring SAML Mappings For SonarQube
The documentation which SonarQube provides for integrating Keycloak via SAML is a little difficult to understand, so I will attempt to clarify it here for you.
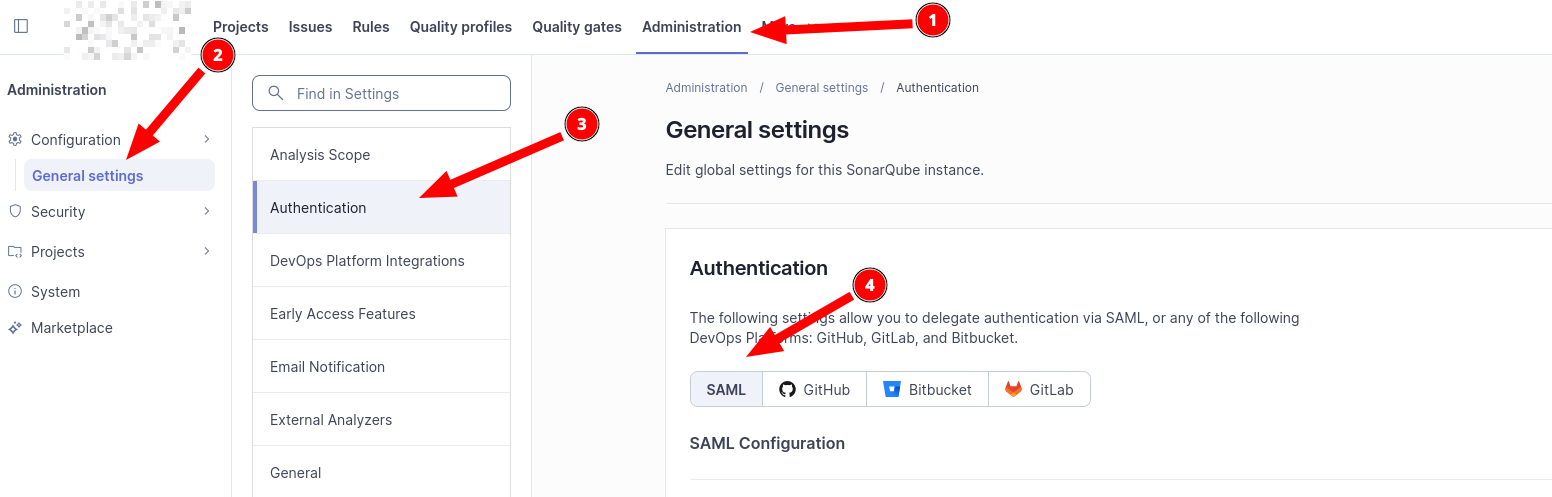
- Open the SonarQube web interface and set up the initial administrator (or use the admin credentials you have already configured)
- Navigate to Administration -> General settings -> Authentication and then click on SAML and Create Configuration
- In the pop-over, configure the following options
- Application ID:
sonarqube- This must match the client ID configured in Keycloak - Provider Name: Keycloak - This is an arbitrary identify which should be descriptive
- Provider ID: https://keycloak.example.com/realms/example - This must match the URL provided by Keycloak's SAML Configuration and should follow the example provided here
- SAML login url: https://keycloak.example.com/realms/example/protocol/saml - This must match the URL provided by Keycloak's SAML Configuration and should follow the example provided here
- Identity provider certificate: Leave Blank - Encryption and signing are not explained in this document (YET!)
- SAML user login attribute: login - MUST match the name of the Login mapper configured in Keycloak
- SAML user name attribute: name - MUST match the Name mapper configured in Keycloak
- SAML user email attribute: email - MUST match the E-Mail mapper configured in Keycloak
- SAML group attribute: groups - MUST match the Groups mapper configured in Keycloak
- Leave the remaining items blank as this document does not (YET!) cover signing and encrypting SAML assertions
- Application ID:
- Click on Save configuration
- Test your SAML configuration
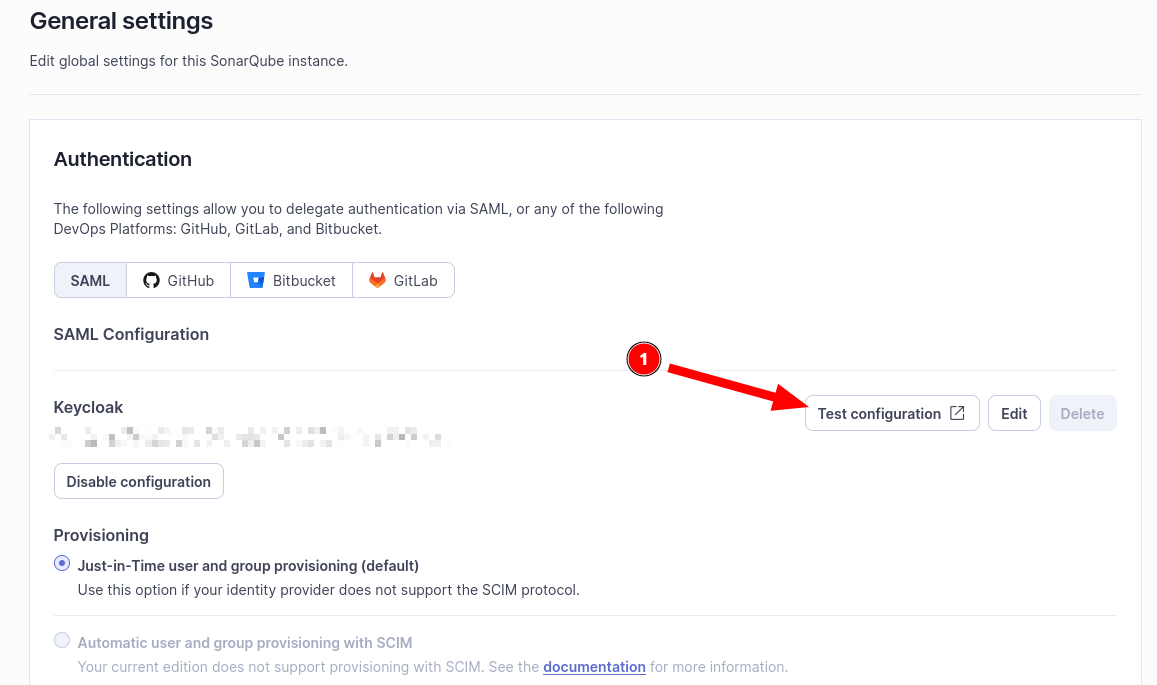
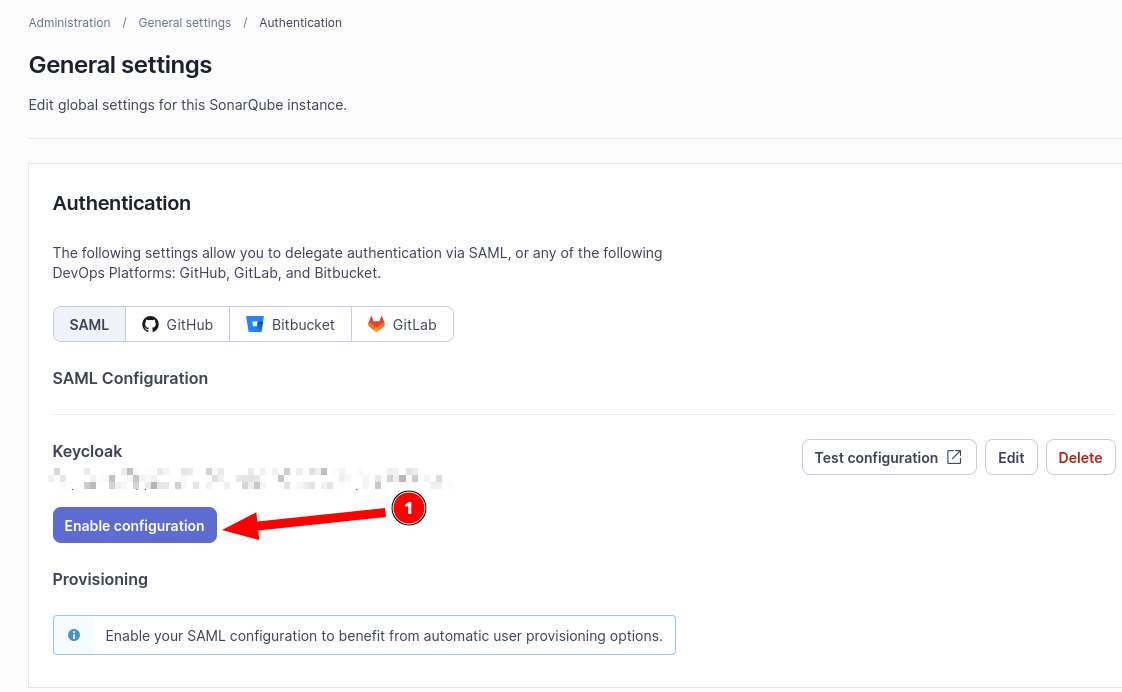
- After authenticating via Keycloak, you should see a report like the following:
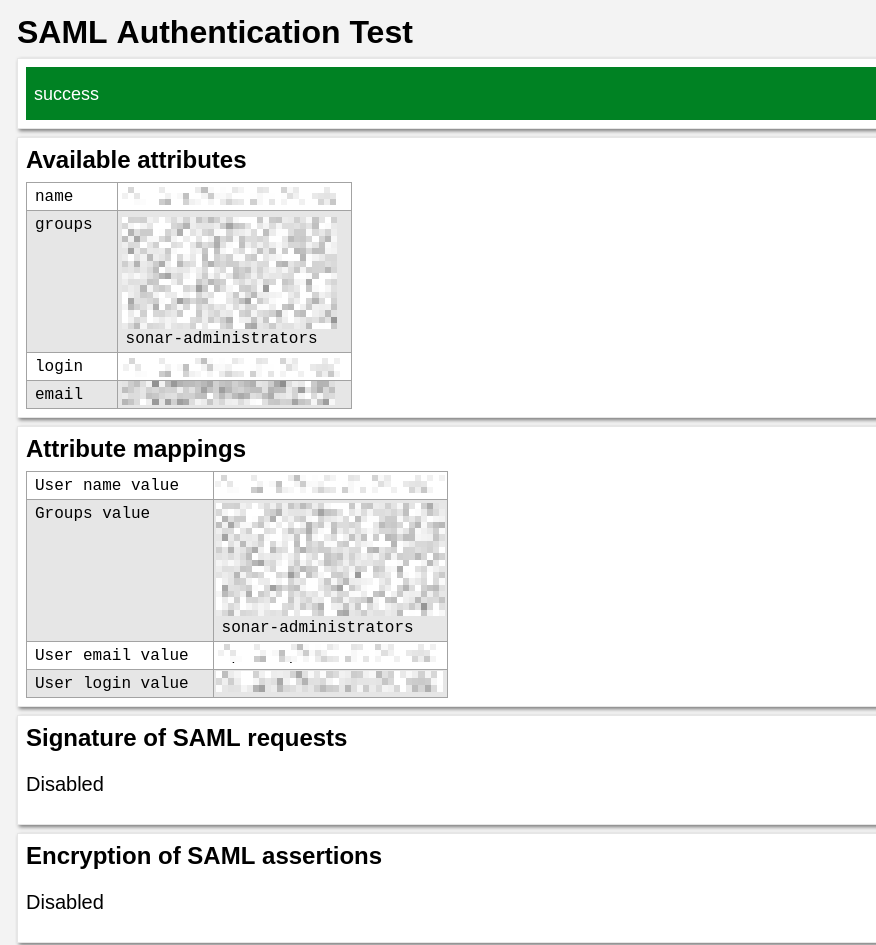
- Enable SAML Authentication
Summary
That's it! At this point, you can use your SonarQube server for analyzing your development projects. This includes the ability to set up scanning tokens. Additionally, any users you assign to the sonarqube-administrators group in Keycloak will have administrator privileges in SonarQube. You can set up additional groups and use those group memberships for project permissions in SonarQube as well.
Best of luck and I wish you happy and productive development!